Auriculostomy – First Surgical Hearing Aid Approach

Originally posted on August 22, 2017. Reprinted with permission.
This post provides an historical archive to the application of hearing aids. The auriculostomy may have been the first surgical hearing aid involvement in the fitting of amplification in that it provided an alternate approach to the application of corrective amplification involving ear-level hearing aids1. This was in 1975. It was an invention of Charles Strzalkowski, an innovative and creative hearing aid dispenser in Milwaukee, Wisconsin. Much of this was driven by Charlie’s desire to better overcome his severe bilateral sensorineural hearing impairment. However, Charlie needed someone to manufacture this instrument for him. That is where we, at Telex (where the author was at that time), entered into the picture where product design, electronics, drafting, tooling, molding, and assembly work was performed. An otolaryngologist in Milwaukee, J. Victor Bolger, performed the surgical procedure, called the auriculostomy.
The auriculostomy utilized a simple surgical procedure that allowed a hearing aid to be fitted in a specially-designed manner to allow for certain cosmetic, fixation, and instrument function improvements over conventional hearing aid fittings at the time. The hearing aid was patented originally in an eyeglass hearing aid arrangement2.
Description
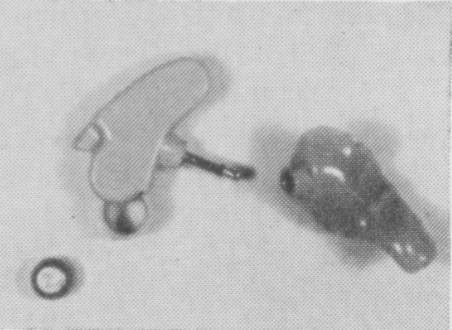
Figure 1. The original commercially-available auriculostomy hearing instrument, in a BTE format. It had a mini plug extending directly from the hearing aid processor, through the fenestra, and into an earmold that extended the length of the concha where it coupled with the mini plug. (In this photo, the earmold is positioned incorrectly – upside down, and should be pointing upward, not downward).
The surgical office procedure for this fitting application was simple and performed under antiseptic conditions. A small fenestra (opening/window) in the posterior/inferior concha cavum of the auricle was made utilizing a special tool. The fenestra penetrated the two epithelial layers (anterior and posterior), two layers of perichondrium covering the auricular cartilage, and the cartilage itself. The surgical procedure to make this opening was called auriculostomy. Through this opening passed a connector that coupled the hearing aid (behind the ear) to a canal earmold that contained the hearing aid receiver/speaker (Figure 1). The canal earmold was originally constructed in such a way that its lateral projection rested at the fenestra opening, and connected with a direct plug-in. However, this was redesigned to remove most of the earmold for improved cosmetics as illustrated in Figure 2.
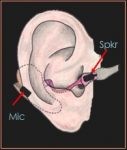
Figure 2. An iteration of the auriculostomy fitting in which the direct connection using a plug into a canal earmold that extended back to the fenestra was replaced with the electrical connection housed in a flexible plastic tube, run along the lower part of the concha, and then wired to a receiver positioned into a much smaller and less visible canal earmold in the opening of the external auditory meatus. The earmold no longer extended across the concha to the fenestra, leaving the concha essentially visibly open and unoccluded.
Advantages Driving This Technology What were the reasons for performing such a radical approach to fitting hearing aids? The advantages were listed as follows:
- More severe hearing losses could be fitted with an ear-level, rather than body-worn hearing aid. What allowed this to happen was that this fitting allowed for more usable gain at the ear-level before acoustic feedback occurred. This was in part because the two transducers (microphone and receiver) were physically separated by distance, and also because the auricle was positioned between them. As a result, this fitting procedure could be used by individuals needing more usable gain than allowed from traditional ear-level fitting at the time, and who refused to wear body-worn instruments. This was meant also to circumvent power CROS fittings, a technique also intended to assist in controlling acoustic feedback (Figure 3).
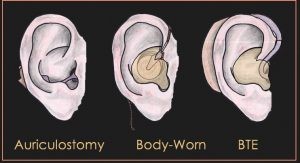
Figure 3. The auriculostomy fitting provided for a more cosmetic fitting because the mass of the earmold, the button receiver of a body-worn aid, and the hearing aid itself was better concealed.
- The hearing aid could be fixed to the auricle better for active persons. By coupling the hearing aid and in-ear parts through the auricle, the device was fixated to the ear of active persons, including children.
- The BTE hearing aid processor was not limited on fitting into the upper space between the auricle and the skull. Some individuals have little space between the auricle and skull, especially in the location where the hearing aid processor normally rests (Figure 4). The alternate anchoring approach used circumvented this issue. The Auriculostomy should work well for those who wear glasses, want a BTE hearing aid, but don’t like it when the hearing aid and the glasses temples compete with each other for the same real estate. However, eyeglass wearers were not as inclined to use such a fitting because it required that they remove the hearing aid every time they removed their eye glasses.
- The auriculostomy would anchor the hearing aid to small ears. Keeping hearing aids on small ears of children has historically been a problem, especially the larger power BTE hearing aids used with those individuals having severe-to-profound hearing levels. A variety of head bands and other such securing techniques could be avoided.
- Improved cosmetic appeal. Some individuals prefer the more cosmetically-appeal of the auriculostomy because the connection to a canal earmold was not as obvious as that to a full shell earmold of traditional body-worn, behind-the-ear (BTE) or eyeglass hearing aids, and might even allow for a BTE fitting rather than a body-worn hearing aid because of its ability to manage feedback better.
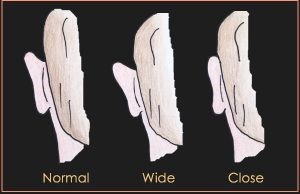
Figure 4. The auriculostomy fitting procedure moved the location of the hearing aid processor to a lower position behind the ear, thus keeping it from pushing out on the upper part of the auricle for individuals where the auricle fitted closely to the skull, and causing discomfort.
References
- Bolger JV, Strzalkowski CW, and Staab WJ. (1975). Auriculostomy. An alternate approach to the application of corrective amplification involving ear-level hearing aids. Hearing Instruments, February, 1975, pp 14-15.
- US Patent 3068954, 1962. Hearing aid apparatus and method.
Auriculostomy continues below, focusing on questions, and the actual procedure.
Auriculostomy Hearing Aid – Surgical Procedure
This post is a continuation of an attempt to archive some historical events related to hearing aids – that of the auriculostomy. As reported in a previous post, the auriculostomy may have been the first surgical involvement in the fitting of an electrical hearing aid. It provided an alternate approach to the application of corrective amplification involving ear-level hearing aids and involved minor surgical intervention1. The auriculostomy hearing aid was invented by Charles Strzalkowski, an innovative and creative hearing aid dispenser in Milwaukee, Wisconsin, in 1975. While the surgical procedure was called the auriculostomy, that term had become to identify the complete procedure, including the hearing aid (Telex Model 90), which was called the Auriculostomy Hearing Aid.
Last week’s post briefly described the surgical procedure, and also described the advantages driving this technology. This post describes the procedure, alone with the types of questions commonly asked. This information is taken essentially directly from a brochure published in 19742.
Auriculostomy Procedures
Following otoscopic evaluation of the external auditory canal, and management of cerumen that might potentially interfere with the finished product, an antiseptic solution was applied to the auricle and to the external auditory canal, and then dried with sterile cotton applicators.

Figure 1. Front of auricle (concha cavum area) and posterior auricle markings with methylene blue to identify the site of the opening in the auricle to be.
After this skin preparation, a fine wooden applicator dipped in methylene blue was used to mark the site of the opening to be. This opening was in direct line with the external auditory canal, both from an anterior and posterior approximation (Figure 1).
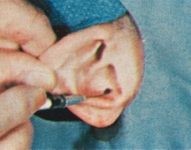
Figure 2. A local anesthetic was injected subcutaneously at the previously marked sites, both anteriorly and posteriorly.
A local anesthetic was injected subcutaneously at the previously marked sites, both anteriorly and posteriorly (Figure 2). A sufficient amount of anesthesia was injected with a #26 needle about ½ to ¾ inches long, directly under the skin to form a wheel about 7 to 8 mm in diameter.
After the anesthetic was well-established, the perforation procedure commenced, using a specially designed and sharpened stainless steel punch 4 mm in diameter. The instrument was lined up with the anterior and posterior markings previously made with the methylene blue, and closed tightly (Figure 3).
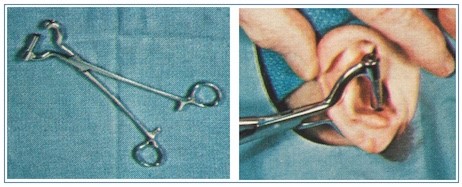
Figure 3. Auriculostomy surgical tool punch (left), and in action (right), creating the auriculostomy hole in the concha cavum.
The instrument punch was held in place for a short time to help with hemostasis. The tool removed a neat circular piece of epithelium perichondrium and cartilage, having passed through the concha on both sides. The slight amount of bleeding was readily controlled by pressure and cotton tip applicators dipped in epinephrine hydrochloride, one to one thousand, and cleansed.
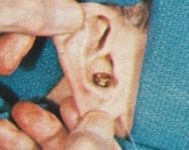
Figure 4. Enlarged portion of metal pin through the Auriculostomy opening to which earmold impression material will attach to assist in proper lining up of the hearing aid processor connection to the external auditory canal.
After all bleeding had stopped, the ear was cleaned and a small cotton block was placed in the ear canal in preparation for the taking of an earmold impression.
A metal pin (Figure 4) was inserted into the auriculostomy for the earmold impression material to have something for form around and attach to. This was necessary so that the finished canal earmold would be properly aligned with the auriculostomy opening.
Earmold impression material was then inserted into the external auditory canal, and also into the concha, helix inside border, etc. in order to obtain a complete impression of the anterior auricle. The impression material was to also enclose the metal pin (Figure 5). Following setup by the impression material, the metal pin that passed through the auriculostomy is unscrewed, and the ear impression is removed from the ear. The metal portion remaining in the earmold impression was required by the earmold laboratory for the proper alignment of the final canal mold to the auriculostomy. (Editor’s comment. The final version modified the electrical connection of the hearing aid processor behind the ear to the receiver at the opening of the ear canal so that it was less visible (comparisons in Figure 6), and as a result, the exact alignment of the auriculostomy to the ear canal was no longer required.
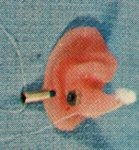
Figure 5. Metal pin through the fenestra unscrewed from its base encapsulated within the earmold impression to allow removal of the earmold impression.
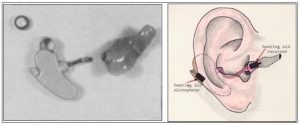
Figure 6. Changes for the initial version (left) to the final version of the auriculostomy (right) fitting for a BTE hearing aid. Going from a direct plug-in to the earmold to an indirect route, allowed for improved cosmetics. It also rendered the positioning of the fenestra in the earmold less important.
The auriculostomy was then inspected and cleansed with an antiseptic solution, and a hydrochloride of marfanil (5%) was sprinkled over the area.
A plastic pin (about 3 mm in diameter), having a collared end was inserted into the opening. The pin had a narrower diameter than the auriculostomy opening (fenestra) to allow the skin to epithelize, and to prevent any slight swelling discomfort (Figure 7). The pin was held in place using adhesive tape over cotton, and to assist in healing.
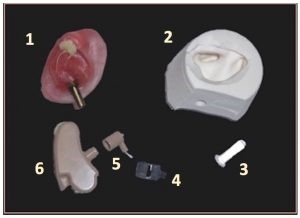
Figure 7. Components/steps used for the finished product. 1) Ear impression with metal collar and metal pin screwed into it. 2) Ear impression investment. 3) Plastic pin used to keep the fenestra open during the healing process and time wait for the finished product. 4) Receiver to be placed in the outer portion of the canal-like earmold. 5) Connector from the concha area through the fenestra to the hearing aid processor. 6) The hearing aid processor.
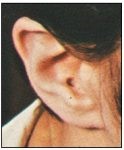
Figure 8. Healed condition from the auriculostomy procedure showing the open fenestra.
The tape and pin were removed each day, and the auriculostomy cleansed. The pin was reinserted and hydrochloride of marfanil reapplied. Following the first day, small circular band aids were used to cover the area, and in seven-to-ten days, the area was healed. The hearing aid with it earmold was then utilized.
The opening remains open through continued use of the hearing instrument with its connector through the auriculostomy, with Figure 8 showing the healed and open fenestra.
Questions About the Auriculostomy Procedure
- What style hearing aids were used? The specially designed hearing aids in use for this fitting are shown in Figure 9.
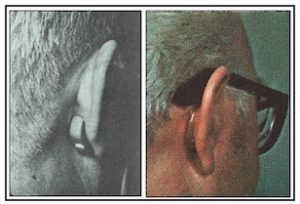
Figure 9. A behind-the-ear (left) and an eyeglass hearing aid in use (right) with the Auriculostomy Hearing Aid fitting. In the eyeglass aid, the wiring to the receiver is encased in a plastic tube that fits behind the ear to the fenestra, where it connects to the concha portion of the connection.
- Who performs the work? The office surgery is performed by a qualified physician. The taking of the ear impression at the time of surgery is performed by a licensed hearing professional.
- Where is the Auriculostomy performed? The procedure is performed in a physician’s office.
- How long does it take? The process involved takes about 20 minutes.
- Is it Painful? The procedure is performed under a local anesthetic.
- Is any special after care required? Very little and much of that which is required is performed by the patient. No side effects were recorded.
- Can the procedure be used with an aged individual? However, physical ability to make the connection may be difficult for those with dexterity problems.
- Can it be used monaurally or binaurally?
- Can the aid be removed? Yes, by simply disconnecting the coupling between the aid and the canal mold.
- What are the reactions of those who have had the Auriculostomy? None regretted having it performed.
- What if the results aren’t liked? The auriculostomy can have its edges surgically freshened and allowed to close – minus the cartilage. No noticeable side effects result.
Editor’s Note: This procedure was not widely used, restricted primarily to the Milwaukee, Wisconsin area. However, it did receive substantial interest at the AAOO (American Academy of Ophthalmology and Otolaryngology) Annual Meeting in Dallas, Texas in 1975.
References
- Bolger JV, Strzalkowski CW, and Staab WJ. (1975). An alternate approach to the application of corrective amplification involving ear-level hearing aids. Hearing Instruments, February, 1975, pp 14-15.
- Bolger JV, Strzalkowski CW, and Staab WJ. (1974). An alternate approach to the application of corrective amplification involving ear-level hearing aids. Telex Brochure, Telex Communications, Inc., Minneapolis, MN, December, 1974.